How to Repair Chipped Paint: A Simple Guide for a Smooth, Professional Finish
Chipped paint is one of those small home problems that can make an otherwise clean room, wall, door, or piece of furniture look old and neglected. A tiny chip may seem harmless, but once the exposed area begins to collect dirt or moisture, the damage can gradually become more noticeable. Fortunately, repairing chipped paint does not always require professional help. With the right preparation, a few basic tools, and some patience, you can restore most small and medium-sized damaged areas yourself.
Learning how to repair chipped paint is mainly about preparing the damaged surface correctly. Simply brushing new paint over a chipped area may hide the problem for a short time, but the new coating can look uneven or begin peeling again. A proper repair removes loose paint, smooths the surface, fills imperfections, applies primer when necessary, and finishes the area with matching paint.
What Causes Paint to Chip?
Before repairing chipped paint, it helps to understand why the paint became damaged in the first place. Paint can chip for several reasons, including age, impact, moisture, poor surface preparation, temperature changes, and low-quality paint.
In busy areas of a home, walls may be accidentally hit by furniture, toys, doors, or household items. Doors and trim can experience even more wear because they are touched and bumped frequently. Paint can also deteriorate naturally over time, especially if the surface has not been maintained.
Moisture is another common cause. If water gets behind the paint, it can weaken the bond between the coating and the wall. In bathrooms, kitchens, basements, and areas with leaks, paint may peel, bubble, or chip much faster than it normally would.
What You Need to Repair Chipped Paint
You do not need a large collection of tools for a basic paint repair. Most small jobs can be completed with a few inexpensive supplies.
You may need a putty knife or paint scraper, fine-grit sandpaper, a small brush or roller, matching paint, primer, lightweight spackle or wall filler, a clean cloth, and a small container for mixing or holding materials.
If the damaged area is on wood, you may need a wood filler rather than ordinary wall spackle. For metal surfaces, the preparation process can be different, particularly if rust is present.
Having everything ready before starting makes the repair easier and helps prevent interruptions while the filler, primer, or paint is drying.
Step 1: Examine the Damaged Area
Start by looking closely at the chipped section. Determine whether only the top layer of paint has been damaged or whether the underlying surface is also affected.
If the chip is small and the wall underneath is solid and dry, the repair should be relatively simple. However, if you notice dampness, mold, cracks, crumbling drywall, rust, or a large area of peeling paint, there may be a deeper problem that needs attention before repainting.
Do not immediately cover a damaged area with fresh paint. Take a few minutes to understand what caused the damage. This can help prevent the same problem from returning.
Step 2: Remove Loose Paint
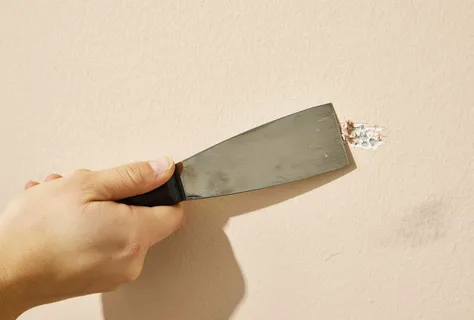
The next step is to remove paint that is already loose. Use a putty knife or paint scraper and gently work around the damaged area.
The goal is not to remove large sections of paint unnecessarily. Instead, remove anything that is no longer firmly attached to the surface. Loose edges can cause your new paint to peel later.
Work carefully, especially on drywall. Pressing a scraper too aggressively can damage the paper surface beneath the paint.
Once the loose material has been removed, inspect the edges again. If you can easily lift another piece of paint with your fingers or scraper, it is better to remove it now rather than allowing it to become a problem after the repair.
Step 3: Clean the Surface
Dust and dirt can prevent filler, primer, and paint from bonding properly. After scraping, wipe the area with a clean, slightly damp cloth.
If the wall is greasy or particularly dirty, use a mild cleaning solution suitable for painted surfaces. Avoid soaking drywall because excessive moisture can cause additional damage.
Allow the surface to dry completely before moving to the next step.
Step 4: Sand the Edges
Sanding is one of the most important parts of learning how to repair chipped paint properly. The repaired area should gradually blend into the surrounding wall rather than creating a visible bump.
Use fine-grit sandpaper to smooth the edges around the chipped section. Sand gently until the transition between the existing paint and exposed surface feels relatively smooth.
You do not need to aggressively sand the entire wall. Concentrate on the damaged area and its immediate edges.
After sanding, wipe away the dust with a clean cloth. Dust left behind can interfere with the filler and primer.
Step 5: Apply Filler to Deep Chips
If the chip has created a small depression in the wall, apply a thin layer of suitable filler or spackle.
Use a putty knife to spread the filler evenly. Try not to apply a thick amount in one pass. Several thin layers often produce a better result than one heavy application.
Allow the filler to dry according to the manufacturer’s instructions. Drying time can vary depending on the product, thickness, humidity, and temperature.
Once dry, lightly sand the repaired area until it feels smooth when you run your hand across it.
If the depression is still visible, apply another thin layer of filler and repeat the process.
Step 6: Prime the Repaired Area
Primer is especially useful when the repair has exposed drywall, bare wood, metal, or another surface that may absorb paint differently from the surrounding area.
Apply a suitable primer over the repaired section and allow it to dry fully.
Priming helps create a more consistent surface for the final paint. It can also reduce the chance that the repaired area will look noticeably different from the rest of the wall.
For very small and shallow repairs, primer requirements can vary depending on the existing surface and paint product. However, when the underlying material is exposed, priming is generally a useful step.
Step 7: Match the Paint Color
Finding the right paint color can sometimes be harder than repairing the chip itself.
If you have leftover paint from the original project, check the container and use it if it is still suitable. If you do not have the original paint, take a small sample or photograph to a paint supplier and ask about color matching.
Remember that even an exact color match may appear slightly different if the existing paint has faded over time. Lighting can also affect how colors appear.
The type of finish matters too. A matte wall should generally be repaired with a similar matte finish, while satin, eggshell, semi-gloss, and gloss surfaces can reflect light differently.
Step 8: Paint the Repaired Area
Once the primer has dried, apply the matching paint.
For a small chip, a small quality brush may be enough. Use a light amount of paint and work carefully from the repaired area toward the surrounding surface.
Avoid applying a thick layer just to make the repair disappear quickly. Thick paint can create a raised spot and may take longer to dry.
Depending on the color and type of paint, you may need a second coat. Allow the first coat to dry before deciding whether another coat is necessary.
How to Blend the New Paint
Blending is important when repairing chipped paint because a simple patch can sometimes remain visible even when the color is correct.
Instead of creating a hard painted boundary around the repair, lightly feather the new paint toward the surrounding area. This can help reduce the appearance of a noticeable patch.
The larger the damaged area, the more difficult it may be to blend perfectly. In some situations, painting the entire wall from corner to corner produces a more uniform appearance.
Repairing Chipped Paint on Wood
Wooden doors, cabinets, windows, furniture, and trim require slightly different preparation.
Begin by removing loose paint and sanding the damaged edges. If the chip has exposed bare wood, check whether the surface needs wood filler.
After filling and sanding the area, apply an appropriate primer before painting. Wood can absorb paint differently from an already painted surface, so proper preparation is particularly important.
For furniture and trim, thin coats generally provide better control than one heavy coat. Allow each coat to dry properly before adding another.
Repairing Chipped Paint on a Door
Doors receive a lot of daily use, so chipped paint around handles, edges, and corners is common.
Start by cleaning the damaged area and removing loose paint. Sand the edges until they are smooth. If the chip is deep, use an appropriate filler and allow it to dry.
After sanding the filler, apply primer if necessary and then repaint the damaged area.
If the door has several chips or the existing paint is heavily worn, repainting the entire door may provide a more consistent result than attempting numerous small touch-ups.
Repairing Chipped Paint on Metal
Paint chips on metal surfaces deserve special attention because exposed metal can eventually develop rust.
Remove loose paint and inspect the exposed area. If rust is present, it should be treated appropriately before repainting.
Clean and prepare the surface, then use a primer designed for the particular metal and paint system. Once the primer has dried, apply the appropriate topcoat.
This method can be useful for metal doors, railings, outdoor furniture, and other painted metal surfaces.
What If the Paint Keeps Chipping?
If newly repaired paint continues to chip, simply repainting the area may not solve the problem.
Look for the underlying cause. Moisture, leaks, excessive humidity, poor adhesion, contamination, incompatible paint layers, or movement in the surface can all contribute to repeated failure.
For example, if a wall repeatedly develops peeling paint near a bathroom or window, investigate whether moisture is entering the wall.
Likewise, if paint repeatedly chips from a frequently touched door, the problem may be related to impact or an unsuitable coating rather than the quality of the repair itself.
Common Mistakes to Avoid
One of the most common mistakes is painting directly over loose or peeling paint. New paint cannot reliably hold together an unstable layer underneath it.
Another mistake is skipping surface cleaning. Dirt, grease, and dust can interfere with adhesion.
Using too much filler can also create problems. A thick mound of filler may be harder to sand and can remain visible after painting.
Some people also rush the drying process. Filler, primer, and paint all need adequate drying time. Applying another layer too quickly can affect the final appearance and durability.
Finally, using a slightly different paint finish can make a small repair stand out. Always consider both color and sheen when matching paint.
How to Prevent Paint From Chipping Again
Once the repair is complete, simple maintenance can help keep the surface in good condition.
Avoid hitting painted walls and trim with furniture whenever possible. Keep areas exposed to moisture properly ventilated, particularly kitchens and bathrooms.
Clean painted surfaces gently instead of using harsh products that may damage the finish. If you notice a small scratch or crack, addressing it early can prevent it from becoming a larger damaged area.
Using suitable primer and quality paint during the original painting project can also improve durability.
When Should You Call a Professional?
Small paint chips are usually manageable as a DIY project, but larger or recurring damage may require professional attention.
Consider getting professional help if the damaged area is extensive, the wall has significant water damage, the surface is badly cracked, or you suspect a structural problem.
Professional assistance can also be useful when you need an exact finish match across a large visible surface.
The key is to distinguish a simple cosmetic repair from a symptom of a bigger problem. Fresh paint can improve appearance, but it cannot fix moisture intrusion, damaged drywall, or structural movement.
How Long Does a Chipped Paint Repair Take?
A small paint chip can often be repaired fairly quickly, but the total project time depends on the condition of the surface and the drying requirements of the materials.
The physical work may take only a short amount of time. However, filler, primer, and paint may each require separate drying periods.
It is better to allow every layer to dry properly than to rush the job. A little extra patience can make a significant difference in the final finish.
Final Thoughts
Knowing how to repair chipped paint can save time and money while helping your walls, doors, furniture, and trim look clean again. The most important part of the process is preparation. Remove loose paint, clean the surface, smooth the edges, fill deeper imperfections, prime exposed areas when needed, and then apply matching paint in thin, controlled coats.
A good repair should not simply cover the chip. It should create a smooth transition between the damaged area and the surrounding surface. When the underlying cause is also addressed, the repair has a much better chance of lasting.
For small household paint problems, patience and careful preparation often matter more than having expensive equipment. With a few basic supplies and the right technique, many chipped paint repairs can be completed successfully at home.